You can find the option to purchase a verified email address under the Settings tab, Account Settings. Note, you must have either a credit card or bank account on file in order to purchase this addon. Once you have purchased the verified email option you will receive an email within 24 hours from our email provider Amazon Web Services with a link that you must click to verify that you are the valid user of the email address that is being verified.
Channel Manager Connection with Reservation Key
Channex works in real-time to sync the calendar's rates and availability with the OTA's. Channex connects with Airbnb, Booking.com, Expedia, Agoda, HostelWorld, and GoogleHotel. The price for this connection is $25 a month for 20 units or less and $35 for more than 20 units.
This step is an optional but nice step to take, so reservations come in with an assigned status or color. Go to Settings Tab > Reservation Status > Add Status Option. Title > Select color > Save

Settings Tab > External Connections > Add Connection > Continue

Look over settings. Select a status (step 1 above) for each channel you wish to connect.


Add Property

Look over the settings and Save Property.

Click into Room Types & Rate Plans to connect the rate plans to each room/unit

Add Rooms/Units and Choose One to One or Room Type mapping. Select Room(s). Add selected.

Select the appropriate rate plan for each room/unit and Save Room Type & Rates

Expand the section titled Channels. This section is where you will connect the channels but first, make sure that you have selected Channex as your channel manager within each OTA account ( directions below)

Booking.com - Log into your Booking.com account. Go to Account > connectivity Provider and search for Channex (Channex.io)

Accept - Yes, I accept. Please email support@reservationkey.com and let us know that you are waiting for provider confirmation.

Expedia - Rooms and Rates Connectivity Settings

Confirm both Rates and Availability and Reservations.

Airbnb - This connection can be made directly from your Reservation Key account. Make sure you are logged in to your Airbnb account before clicking on Connect with Airbnb.
Please note that we need to set your timezone up directly in Channex before the connection can be complete. Please email support@reservationkey.com and ask for us to set your time zone for an Airbnb connection.

Expand the Channels section. Click + Create


Once you have a successful connection, click on Mapping. Map Rooms and Rate Plans from Channel to Channex and save.

To increase or Decrease the rates you are sending over to the channels. An optional setting.

Click Actions and Activate > Full Sync

Please note that anytime you change your rates or your minimum night stay requirements in Reservation Key, you need to click Sync Rates to update Channex and the channels.

Review your availability and rates that are being sent over to the channels.

Booking Section - A list of all bookings via Channex will populate here in this section.

This guide shows how to connect a Terminal to your ReservationKey account, and then process payments with it.Type image caption here (option

1. First add your device - Website tab, Payment Methods (if you have't yet added Square, add a new payment method, Square)

2. Enter a name for your terminal in order to generate the code:

3. Type this code into your device.

4. Verify the device is paired, you will see this message appear after pairing:

5. Now, when you go to Payments in a reservation, you will see this option:

6. Click Request Payment - the payment amount will show on your Terminal. Swipe/dip/contactless the card and approve payment.

7. ReservationKey will automatically update with the payment made on the Terminal.

Adding A New ReservationUsing the slider and / or Month tabs at the top of the availability calendar select the month and day period of the reservation. You may also search by clicking the [T] = today or [S] = search in the top left corner

Select the desired room and dates of the reservation (The selections will turn turquoise) Then, Click Add Reservation.

Guest DetailsRepeat Guest: If a guest has been to your property before then enter the last name and click Search

If needed refine the search by adding part of the first name in the field and searching again. Find and select the correct guest and click on Select.

New Guest: Add guest information into the Reservation Details window and click Save

Functions of Reservation Details PageSave: Use to save all changes to the reservation.Cancel: Use to cancel recent input into this screen.Availability: Click here to return to the calendar.

More: Delete Reservation (this removes the reservation from the system entirely and can't be undone)

Change / Move: Allows you to change the dates and room assignments of the reservation

Discounts: Lets you add discounts if needed

Fees: Lets you add Fees if needed

Items For Sale: Lets you add Items for sale

**You must add Discounts, Fees, or Items for sale to the system first for these features to function properly.Processing PaymentsPayments: Click Payments. Manually record payments made with check, cash or the Offline Credit Card option. Change or add the category accordingly, select the date and enter the amount, click Add PaymentRefunds: Refunds are recorded using the payments button. To record a refund enter a negative amount. Click Add Payment. All activity will be shown below.

If you are linked to a credit card processing company such as Square, Stripe, or Authorize.net, you will see an orange Charge Card button. Click this to process payments.

If you are processing Offline Credit Cards the last 4 digits of the credit card number will be saved in the reservation details page. The first 12 digits of the credit card will be sent to you via email. This email will be sent to the email address that is associated with your RK account.

Correspondence: Click here to send or print emails. You can also click on History & Queue to gather more information, such as what has been sent and what is scheduled to be sent.

Status ChangesYou can change the status of a reservation here. The different colors will show on your Availability calendar.**To customize the status tags go to Settings Tab > Reservation Status.

Status labels will display on the calendar like this:

Setting Rooms To UnavailableFind the room you wish to set as Unavailable, click to select the desired dates (selection will turn turquoise). Then click on the status Unavailable at the bottom of the calendar.

Another optionGo to Properties Tab > Room/UnitsSelect the rooms/units you want to set to unavailable and click Set As Unavailable from the bottom of your screen.

Set start and end days and click Save Changes

1. Once logged in, click on SETTINGS > EXTERNAL CONNECTIONS.

2. Click on ADD CONNECTION.

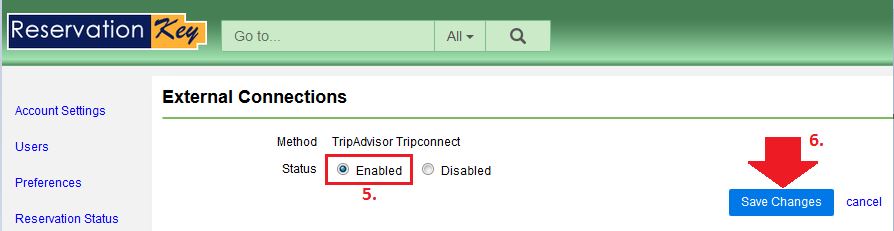
3. Select TripAdvisor TripConnect from the dropdown.4. Click the CONTINUE blue button.

5. Tick the ENABLED button.6. Click on SAVE CHANGES blue button.
7. Click ENABLED PROPERTIES then ADD PROPERTY.

8. Select the property from the drop-down.9. Make sure that the details in red and bold text are correct.

10.Select the amenities that your property is offering.11. Click the SAVE PROPERTY SETTING button.12. There will be a pop up stating that it is SAVE if it is successful.

1. Once logged in, click on SETTINGS tab on the top right corner of the page.
2. Select ACCOUNT SETTINGS from the drop-down

3. Click PAYMENT METHOD to expand.4. Select CREDIT CARD as the payment method.

5. Enter the Credit information.6. Click one Save Credit Card.7. You will then see the credit details with the encrypted card number for security purposes.

How do I add an iCal link (such as for Airbnb or VRBO)?It is possible to import and export to external calendar such as AirBnb, VRBO, or Google calendars using iCal links.
1. To Import reservations from other calendara.
a. Click on “iCal link” from the bottom right part of the website.

b. Click the “Add” to which room to room where you want to sync.
c. Type the Name and URL of the external calendar.
d. Click on “Sync with this Calendar”

Calendar will then be successfully added. At any time you want to re- sync, you can click on “Sync Now”. This is automatically sync throughout the day but if you want to sync a new reservation immediately to your Reservation Key Calendar, you can click on “Sync Now”
2. Export (From Reservation Key to any other external Calendar.)
a. Click on “Export”.
b. Select the URL of the room where you to export and paste it to your external calendar or browser.
c. You can add these codes after the URL to if you want to include this certain detail.

Examples:
Result for the URL only:

URL with the code

ReservationKey does not offer its own credit card processing, but works with several different companies that handle payments. Here are the options for accepting payments.
Fully integrated. Seems like a great alternative to having to pay monthly fees for processing, and competitive rates.
Many happy clients reporting they pay NO monthly fees, just a straight percentage (2.75%).
Tony Maskell
Easy to set up, good rates, modern technology.
Also a modern processor, with an especially good portal for reviewing payments.
Fully automates the payment process. The guest's credit card can be charged a deposit at time of making the reservation. Additional payments can be charged by you with a click of a button from within the Payments section of the Reservation Details. PRO Completely automated. No need to ask guest for their credit card when they arrive/checkout since that information is saved in ReservationKey (using a secure token with Authorize.net). CON Customer Information Manager (CIM) required to process credit cards within ReservationKey with a push of a button. Normally there is an additional charge from Authorize.net for CIM.
https://www.ndmsdirect.com/partner/reservationkey/, www.authorize.net
Authorize.net
$5000/month minimum processing volume
Interchange+ 1% + $.10
PaidYET
$0/month minimum 3.5% + $.35
Todd Eichner
NATIONAL | Accept Credit Cards. Simply.
310.997.0100 (o)
* Works in Canada
This is the only option that does not involve an external company. With this method, the last four digits of the guest's credit card are saved in ReservationKey. The remainder of the digits are emailed to you. When you want to charge the card you need to create the full number by retrieving the digits from the email and from within ReservationKey. PRO No extra fees. CON Credit card processing not automated within ReservationKey.
Guests are redirected to PayPal to make their payment. Once they pay, ReservationKey is updated to show the amount of their payment. The system can be set up to automatically change status color once the payment goes through. One way to set this up is so that upon initial reservation request the calendar is not blocked. Once payment is made, the status can be set to one that blocks the dates on the calendar. PRO No monthly fee. Very quick to set up. Decent rates. People familiar with PayPal. CON Some people strongly dislike PayPal. Guests may make reservations but not follow through with payment.
Highly recommended. Fully automated payment processing. Click a button within ReservationKey to charge the guest's card.
PRO Competitive pricing; find out right now how much it will cost by clicking here to receive a quote. CON Not free.
Similar to Authorize.net and GoEMerchant. Click a button to charge your guest's card, and a deposit can be charged automatically at time of reservation. PRO Fully automated. CON No online quote option.
MATT BRUNO Director of Independent Sales Channels, Payment Logistics
Toll free: 888.472.9564 ext 231
The switch over is really very simple. Go through this checklist to make sure you are ready to make the switch to your new ReservationKey account:
1. Create a ReservationKey Account
When you sign up for a trial account, you’re getting access to our full system—the exact same system, login, etc. that you will use once you go live. You can configure the ReservationKey just the way you like it prior to cutting over.
2. Set Up Rooms, Rates, Fees, Taxes, Discounts, etc.
Make sure that you have all of your rooms, rates, photos, descriptions, etc. in place. This is the first step to setting up a new account.
3. Set Up a Payment Method
Decide how you want to take payments through ReservationKey. If you are taking credit cards, make sure that you have set up your credit card processor in the system and that you've activated your account with them.
[Link to FAQ on Payments]
4. Do You Need to Use Our Channel Manager?
If you are looking to have your rooms/properties published out to OTAs such as Booking.com and Expedia, you'll need to make sure that you have MyAllocator set up both in ReservationKey and in MyAllocator.com.
Once you have the connection in place, here is a [video guide] to help you through setting up your rooms.
5. Emails
Spend some time with the automated emails in the system. This will make your life much easier to have these formatted and sent out automatically.
6. Select a Theme
Customize your theme so that your booking pages match the look of your website. We have several themes to choose from.
7. Make Test Reservations - Public Booking Page
The best way to test is to make your own reservations. From the Website tab in ReservationKey, select Reservation Pages.
Here you will see both Availability and Calendar previews of your booking pages. You can click on these links to see your booking pages. These are the exact same booking pages that your customers will see when they come to your website to make a reservation.
From here, you should make a reservation for yourself. This way, you can ensure everything works correctly.
Check your emails, check yourself in to the room, check out, etc. Is everything working the way that you would like for your guests? If so, you are ready to go!
8. Add Your Existing Reservations
If you have fewer than 50 upcoming reservations, it’s fastest to manually add them to the system.
Otherwise, email us (support@reservationkey.com) a file containing your reservations, and we will import them for you (the file can contain historical data as well as future reservations).
Please format the file prior to sending it to us.
9. Point Your Website to ReservationKey
Right now, you have links on your website that point to your current booking pages. These may be in a few places, including each room’s page.
For each of these links, they will now need to point to the booking pages hosted by ReservationKey.
You can do this change yourself or your web developers can do it for you. Generally, you would make a copy of each of your current pages with the new links and save them as drafts.
This way, you can view the page and test it out. Once you are comfortable that the page is working correctly, you can publish the new page.
Once this is done, you are now live on ReservationKey. Your update will be completed in a matter of seconds, and no one will ever know you made any changes!
Before Myallocator can connect with your ReservationKey account you need to select ReservationKey as your PMS in your Myallocator account.
1. Log into your Myallocator account.
2. Click Manage at the top of the screen.

3. Click PMS Connections in the Integrations section on the left side of the screen.

4. Select ReservationKey from the drop down field and click Add.

For additional information on how to set up the connection from ReservationKey to MyAllocator view our helpful video:
http://reservationkey.com/help-v2/videos/youtubeviewer.asp?v=MQBe8Whp_HY
Page Header
This message appears in your page header and will show at the top of your reservation page. Some ideas for what to put in this section include a description of your property, special instructions for making reservations, contact information, etc.
Page Footer
This information will appear at the bottom of your reservation page. It might include your company address and contact information.
Example:
address here | street here | city, state zip | 123.123.1234 (phone)
Page Offline
This message will appear to users when your page is offline. You can set the online/offline status from the Reservations Pages tab.
Privacy Policy
If you have terms and conditions that guests must agree to before making a reservation, you can enter them here.
Cancellation Policy
If you have a cancellation policy that must be agreed to before a guest can make a reservation, you can enter it here.
Request Confirmation
This is the message users will see upon submitting a reservation request.
If you take online payments and require a payment to be made immediately upon a reservation request, you could explain your policy here.
Payment Page
If you require users to return to your reservation page at some point between when they made their reservation and the first day of their stay to make a second payment, you can put a message here regarding the payment process.
Payment Confirmation
This is the message users will see upon submitting a reservation request.
If you take online payments and require a payment to be made immediately upon a reservation request, you could explain your policy here.
Reservation Cut-Off
This message will be shown to users trying to make a reservation within the cut-off time period you have designated.
This setting is made in the Website tab under Reservation Pages. You can decide if you want to accept online reservations at any time, or only starting at least X number of days from the current date. This helps prevent people from making last-minute reservations through your website.
Beyond Booking Range
This is the message users will see if they try to make a reservation that is too far in the future.
This setting is made in the Website tab under Reservation Pages. You can decide if you want to accept online reservations at any time or only starting at least X number of days from the current date. This helps prevent people from making reservations too far in advance.
No Availability
This message shows when there is no availability for the dates the customer has selected.
Waiting List Inquiry Form
This message appears when there are no vacant rooms, and the customer would like to be added to a waitlist.
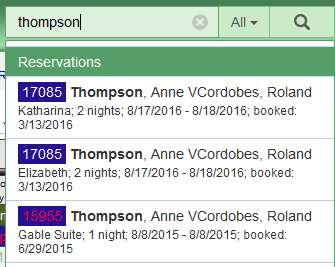
We now have a way to search six different sections of the system, quickly and as you type. You can search all six sections at the same time, or select from the drop down field to only show results from one section at a time.
Here are some notes about each section.
1. Reservations
Search by guest name, phone, email, address, ID number, and words within the notes fields. Type in a list of reservation ID numbers (separated by spaces or commas) and all matching reservations are returned.
2. Guests
Search by name or email. Click a guest to open up the small guest details window for editing that guest information.

3. Content
Search for any content you have added to the system. For example search by room name and you can jump directly to the edit screen for that room. Search by user name and go directly to the user settings page.

4. System
This section returns links to specific sections of the system. For example, If you can't remember where to edit Taxes just type "taxes" into the search bar and all the places where taxes appear in the system will be listed.

There are also a couple of special searches:
"bye" - sign out from the system
"forum" - opens the forum
"myallocator status" - opens the status modal
"change log" - opens the system change log modal
"new reservations" - opens the new reservations window
"reminders" - opens the reminders window
5. FAQs
Links directly to our FAQ database. Click a result and the answer will open within the system in a modal window.

6. Videos
Search our database of tutorial videos. Click a video and the video opens directly within the system.

In order to add authorize.net payment method, you need to go to Website Tab, Payment Methods, Add Payment Method. Select Authorize.net.

You will need your API Login ID and Transaction Key.

To retrieve this information, go to http://authorize.net and login to your account. Click on Account at the top of the page.

Scroll down to Security Settings click on API Login ID and Transaction Key.

Answer you secret question and click Submit to find your keys.

Then you can find your login credentials.

For international guests, you need to make one additional setting, DISABLE (un-check) the box to reject guest's credit cards when "The card issuing bank is of non-U.S. origin and does not support AVS." To find this, go to Account, Settings, and click "Address Verification Service".

And uncheck the box:

City and State should be UNCHECKED also, in Account --> Payment Form --> Form Fields.


These AVS settings are known to work:


Yes, when your reservation and guest data is properly formatted, it can be loaded into ReservationKey. Your data should be saved in a Microsoft Excel file according to the following specifications:
1. Create One Line Per Reserved Room
2. Required Columns
Use these labels as column headers in your spreadsheet:
3. Optional Columns
Use these labels as column headers if applicable:
4. Submit Your File
Once your Excel file is formatted according to the instructions above, please email it to:
support@reservationkey.com
Be sure to include your username in the email as well. We will notify you when the data has been successfully loaded into the system.
If you have a property with many rooms of similar types, where guests reserve by the room type rather than the specific room, we have what we consider a hotel style property, and there are a few things to keep in mind when setting up the system so that it performs best for this situation.
Under Properties Tab, Room Types add all your room types. Make sure to add photos and descriptions here rather than under each individual room (expand Hotel Style section).

- In Rate Plans add your Rate Plans, one plan per room type, using the same title as the room types.

Under Rooms/Units use our Bulk Add/Edit feature to add all your rooms; select the matching room type and rate plans you previously set up.- Enter the room number in the room number column and room name in the name field (using the exact same name as you used in the room type settings; the reason to use the same name is that our public hotel style reservation pages use the room type in the search results, but once a unit is selected the room name is used, so best if these match).

Under Settings, Preferences decide how you want room names/numbers to show on the internal calendar; perhaps you only need the number to show.- Consider making the rows and text smaller for the internal availability calendar so more units will fit on your screen.


Under Website, Reservation Pages, add a new page, Hotel Style.

- Near the bottom, make sure to select the units which should be able to be reserved from this reservation page.

- Carefully review the rest of the settings and set as you like.
To add your reservation page to your website, you need to add a link, or embed it in an iframe on your site. You can find information about how to link to your Reservation Page, at the bottom of the settings for the page.Click anywhere on the line of the page you want to link to:

Then scroll down to the section called Linking To This Page:

There you will find your iframe and linking options.
Some more information can also be found on our blog, in these pages:
Adding ReservationKey to Your Website
Do You Need Your Own SSL Certificate?
Normally, we do not edit individual user's websites. You need to work with your web developer or find a web developer to work on your business's website.
To preview your page, to see what it looks like, and for testing, just click the word Availability (or Calendar for calendar view) on the list of your pages.

1. How do I take payments through the system?
We integrate with several credit card processing companies (such as Authorize.net), which makes it easy for guests to pay at the time of reservation. You can charge their card with a click of a button from within ReservationKey.
If you simply need credit card numbers (and process them outside of ReservationKey), the system can be configured to email you all digits except for the last four digits, which are securely stored in ReservationKey with the reservation details.
We also integrate with PayPal, allowing your guests to be redirected to PayPal where they can submit payment.
2. How do I link the system to my website?
Every ReservationKey reservation page has a unique web address (URL). The easiest method of linking your website to the reservation page is to create a button on your website that links to your reservation page.
It is also possible to embed the system into your website using an iframe. Additionally, you can link your mobile website to our mobile system.
Upon request, we can design a custom theme for you so that your reservation page matches the look and feel of your website.
3. Will the system automatically send emails to guests and is it possible to customize them to my needs?
Yes, the system can be set up to send emails automatically at various times, such as at the time of initial reservation, when a payment is due, and X number of days before/after the reservation.
You can design your own messages and customize their look to meet your needs. Plus, we offer many merge codes that insert data from the system into your templates.
4. Can I set up complicated rates? Such as minimum stays, different prices on weekends versus weekdays, adjust prices for holidays/special events, etc.?
We offer a variety of ways to set rates, including the ability to accommodate minimum stays, different prices for weekends versus weekdays, and adjustments for holidays and special events.
5. Is it possible to import reservation data from my old system into ReservationKey?
Yes. Just send us an email with your reservation data in an Excel spreadsheet that meets our formatting specifications, and we will load your old data into ReservationKey. We are typically able to do this quickly, usually within one or two days from when we receive the file from you.
6. Please explain your pricing.
Our subscription fee is based solely on the number of units you are managing with ReservationKey. The definition of a "unit" depends on your business type—whether it’s a room, bed, boat, house, condo, etc. We do not charge per reservation (no commission), and we charge no other fees.
You may encounter additional charges if you want to connect to third-party systems, such as for payment processing or channel management.
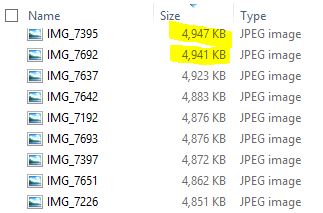
We require images to be resized to less than 800kb prior to uploading them to our system. This refers to file size not pixel size. For example, you can see that all these images are much larger than 800kb.
The thing to do is to use photo editing software to resize the photos to a smaller file size. Usually photos taken with a digital camera will be really large, so they need to be saved smaller to make the file size smaller. I usually use Photoshop to do this, although it is possible to do this with almost any photo editing software. Here are some resources about how to do resize your photos:
http://www.wikihow.com/Resize-a-JPEG
http://graphicssoft.about.com/cs/digitalimaging/f/howreducesize.htm
http://osxdaily.com/2016/09/05/how-to-resize-photo-mac/ - Resizing for Mac
Ideally, it would be possible for our software to accept really large uploads and we would do the resizing for you, but at this point we don't have that functionality. In case you don't already have photo editing software, here are a few websites where you can upload your photos, the site will resize them, and then you can download them back:
http://www.shrinkpictures.com/http://www.imageoptimizer.net/Pages/Home.aspx
Because ReservationKey is a system specializing in reservations, we have consciously decided NOT to build a system for sending mass email. Instead, you will need to work with a company that specializes in this (such as Constant Contact, Vertical Response, MailChimp, etc.). These systems allow for email addresses to be imported from a file, which is a file you can create in ReservationKey.
To export your guest details, including a list of all your guest emails, go to Reservation Manager tab, Guests.
There, select VIEW ALL from the first drop down and then check the box Export. Click Go.

Save the file to your computer. This information can the be used with third party email services such as MailChimp or ConstantContact.

1. Go to our apps page.
Click here to go to our apps page.
2. Click on an link to add an app (for purposes of this FAQ we are adding the simple online reservations app).
Click the Facebook add button on the next screen.

3. Go to the newly added app.
The app now appears as a tab on your Facebook page. Click the tab.

If you are already in an app on your page, you can also click the dropdown list to change apps.

4. Log into your ReservationKey account on the app.
Once logged in, you can set your Reservation Page URL and page height. The URL is the link (address) to the Reservation Page you want to show within Facebook. Just open the Reservation Page you want to use and copy the address from your browser's address bar, and paste it into this field.

5. Customize the app name and logo.
Click on your page name in the upper left corner.

Then click Edit Page and select Edit Settings.

Then click Apps from the list on the left side of the page, and select the app you want to edit.

Now change the name, and add a custom image (optional).

Example of custom graphic and name:

6. Change the order that your apps appear in your tabs (put your online booking one near the top).
Go to your page, and click the down arrow on the right side of your tab bar. This will enable editing for each tab.

Now put your mouse over the app you want to move and click on the little pencil icon that appears in the upper right corner. Then select which other app you want to swap positions with.

You can select from our graphics, if you like (save to your computer and upload to Facebook).
Yes, when your guest data is properly formatted, it can be loaded into ReservationKey. Your data should be saved in a Microsoft Excel file according to the following specifications:
1. Create One Line Per Contact
Ensure that each guest contact is listed on a separate line.
2. Optional Columns
Include the following optional columns in your spreadsheet, using these labels as column headers:
3. Submit Your File
Once you’ve formatted your Excel file according to the instructions above, please email it to:
support@reservationkey.com
Be sure to include your username in the email. We will notify you when your data has been successfully loaded into the system.
Trends in computing are constantly changing, and one big trend these days is that more and more people are using their mobile devices to accomplish what they might have previously done with their full size computers. Therefore it is important to make sure your website and reservation system displays nicely on mobile devices as well as on traditional laptop and desktop computer based browsers. Larger devices such as iPads and other tablets likely display your regular website without much difficult, but smaller devices such as mobile phones (iPhone, Android, Windows Phone, etc.) might have a harder time since their screens are typically much smaller.
In response the this increasing demand for mobile usage, we have created some new options which make it extremely easy to use your existing Reservation Page on a mobile device. In the Reservation Page settings, we now have a section for selecting which theme to use when your guest is viewing your Reservation Page on a mobile device. To accompanying this, we have created a brand new theme called "Mobile Simple One Column" and an option to display the Reservation Page in one column. Previously all of our different styles of Reservation Pages (multiple units, single unit, hotel, etc.) always used two columns. On a small screen however, it is much more difficult to display two columns since the screens simply are not wide enough. So now you have an option to use a single column system on mobile devices.
ReservationKey will automatically detect when a guest is using a mobile device and change to the theme you have set as your mobile theme.
To set this up, go to Website Tab, Reservation Pages, and edit. Go to the themes section (near the top), and select which theme to use for mobile. We highly recommend using the new Single Column theme, and make sure you check the box to use the One Column Layout.

Once you have saved these settings, this is all you have to do to turn your existing page into a page that is nicely formatted for mobile use. Now, when a guest visits your Reservation Page with their mobile device they will automatically see the mobile version. Of course, we recommend testing your page on a mobile device and that you make any changes necessary to improve the guest experience.
The mobile interface starts with asking the guest to enter their dates.

After clicking Search, the rooms are displayed.

Once one room is selected, the page will automatically scroll down to the Items for Sale section, or the Reservation Summary if no items are listed.

Then the guest continues scrolling down to complete the reservation form.

The system also works well in landscape mode.

Of course, you might want to edit the look and feel of the mobile version, and that is possible just like we do for the normal themes. Simply load the new Mobile Simple Single Column theme in the Themes and edit as you like.


As always, we will continue to tweak this feature as we receive feedback, and as technology changes.
It is a great idea to open your Reservation Page(s) and test the system as if you were a guest. We recommend that you go through the entire booking process and make sure everything looks ok, especially the messages that appear on the site (under Website Tab, Website Messages), theme, your rates, photos, descriptions, and the email that your guest receives upon making the reservation (under Website Tab, Email Templates, and Email Schedules). If you are collecting money up front (using one of our integrated payment methods, such as Authorize.net) then we recommend that you also test to make sure the payments process correctly.
To view your Reservation Page(s) go to Website Tab, Reservation Pages, and click either the word Availability or Calendar next to the page you want to view.

This will open your page in a new tab and you can test out the system. You should try both Calendar and Availability views, and decide which you like better, and then use your preference as the page you link to from your website. Many users prefer the Availability view since that forces the guest to enter their dates and then search to see what is available, and for businesses that have a lot of availability, they prefer this since potential guests do not see that they are often not fully booked.
How to Export Reservation Data.
1. Once logged in, click on Reservations Manager tab on the top right corner of page.
2. Select Reservations from the dropdown.
3. Set the Date Range to your desired settings.
4. Also set the Date Type From, and To according to your requirements.
5. Tick the Export Results ticked box.
6. Then click the blue Search buttons.

7. Select the details of the reservation you want to include.
8. Select the Rooms which reservations you want to be included.
9. You can also select the format of the date of reservation.
10. Click the Create Export File

11. Click on Click here to Save Export File.

12. Save the file by clicking OK.

13. An Excel file will then be downloaded.
14. Open the file to review if you have the details that you need.
Unfortunately, bugs can happen occasionally. We prioritize identifying and fixing bugs as they can affect the system's functionality and cause frustration for our users.
What We Need to Fix a Bug
To efficiently resolve a bug, we need specific information to reliably replicate the issue. If we can replicate the problem, it’s much easier to identify the source and fix it.
Key Information to Provide:
If You’re Unclear About the Details:
Sometimes, you may not have all the specific details, especially if the issue happened during an online booking. In that case, please provide as many details as possible, or ask the guest to assist by sharing more information.
For Internal Issues:
If the bug is related to an internal system error, please provide a description of the steps you took before the bug occurred. For example:
Thank You for Your Patience and Understanding
We appreciate your cooperation when bugs arise. By providing this detailed information, we can quickly address and resolve the issue.
Founded in 2007, ReservationKey was created to offer a simple, yet powerful and affordable solution for managing reservations and displaying availability online. Our goal is to deliver top-quality software that fulfills our users' needs - simple, efficient, and budget-friendly.