Operations | August 4, 2012 | 3 min read
How to Create Dropdown Field for Check-in Time
By popular demand, you can now customize the Check-In Time field to leave it as a text field, or make it a dropdown with your own dropdown selection text. To make a dropdown, go to Website tab, Reservation Pages, edit your page, scroll down to near the bottom, the section called Reservation Form, and click …
Introduction to ReservationKey Custom Fields
By popular demand, you can now customize the Check-In Time field to leave it as a text field, or make it a dropdown with your own dropdown selection text.
To make a dropdown, go to Website tab, Reservation Pages, edit your page, scroll down to near the bottom, the section called Reservation Form, and click Customize. In the label field for Check-In Time, add your label, in this format: [label name] dropdown:[value1#value2#value3]
Everything after the word “dropdown:” will be assumed to be the dropdown values, separated by # sign. Everything up to the word “dropdown:” is treated as the label for the field.
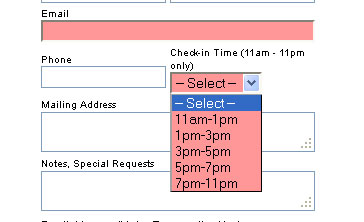
Such as: Check-in Time (11am – 11pm only) dropdown:11am-1pm#1pm-3pm#3pm-5pm#5pm-7pm#7pm-11pm
Here is what the final product looks like:
In the world of online bookings, clarity and consistency are key. If you're using ReservationKey and still relying on open-text fields for your guests’ check-in times, it’s time to step up your form game. This blog will walk you through how to create a dropdown field for check-in time in ReservationKey, making your forms more user-friendly and error-proof.
Why Dropdowns Are Better Than Text Inputs
Open text fields allow flexibility—but sometimes, that’s a problem. Guests might write “eleven,” “11AM,” or even “late afternoon.” You don’t want to interpret vague entries every time. A dropdown solves that.
Importance of Structured Check-In Data
Having structured check-in options improves:
- Scheduling for cleaning and reception
- Sync with automated systems
- Fewer misunderstandings and guest calls
Get A Free Trial And Start Your Journey
Step-by-Step Instructions to Create the Dropdown Field
Step 1: Access Your Reservation Page
- Log in to ReservationKey.
- Click the Website tab.
- Select Reservation Pages.
- Choose the page you want to edit.
Step 2: Navigate to the Form Editor
Scroll down to the Reservation Form section and click Customize.
Step 3: Add Dropdown Formatting Syntax
Now, update the label of your check-in field using this format:
Check-in Time dropdown:11am-1pm#1pm-3pm#3pm-5pm#5pm-7pm#7pm-11pm
The part before dropdown: is your label. The part after is a list of options, separated by the # symbol.
Step 4: Sample Code for Dropdown Setup
Here’s a great example:
Check-in Time (11am – 11pm only) dropdown:11am-1pm#1pm-3pm#3pm-5pm#5pm-7pm#7pm-11pm
This will show a neat dropdown list with 5 clearly defined time blocks.
Step 5: Save and Preview Your Form
After updating the field:
- Click Save.
- View your live booking form.
- Test the dropdown to confirm it appears correctly.
Example Dropdown Field Configuration
Recommended Time Blocks
- 11am–1pm
- 1pm–3pm
- 3pm–5pm
- 5pm–7pm
- 7pm–11pm
These blocks ensure flexibility while keeping things manageable.
Customizing for Unique Check-In Policies
You can adjust blocks to suit your operations:
- Add overnight check-ins
- Restrict early check-in requests
- Create time-specific pricing if needed
Benefits of Using Dropdown Fields
AdvantageWhy It’s ImportantConsistencyAvoids typos and vague entriesBetter UXEasier for users to choose a valid timeEfficiencySimplifies internal planning
Advanced Custom Field Tips
ReservationKey isn’t limited to dropdowns. You can also:
- Link fields to specific unit types (great for multiple properties)
- Use conditional fields to show extra inputs based on user selections
- Try checkboxes, radio buttons, or text areas for more flexibility
You’ll find all these under Settings → Custom Fields.
Common Mistakes to Avoid
- ❌ Skipping the
dropdown:keyword - ❌ Using commas instead of
# - ❌ Not testing the form live
- ❌ Forgetting to press Save
Double-check your formatting and preview everything!